Wednesday, September 18, 2013

Sweet Rosettes

Rosettes are such a pretty embellishment to put on a window treatment, and so easy to make. I love doing them in silk, as they stand up nice and lovely.  Silk is so perfectly workable. So here is an easy "how to" to follow.
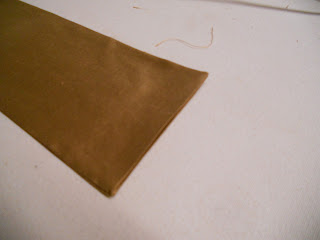
    Cut out two pieces of fabric about 8 1/2 inches wide by 17 inches long.

Fold in half, long way, and then stitch the edges together. Do this with both pieces.
 
 
Press flat with the seam centered on the back side. Your pieces should be about 4'' x 17"
 
Tuck in and press about  1/4"  at one end
 
 
Fold the short ends towards each other in the center of the back side and tuck the unfinished edge into the end that you have pressed in.
 
This should measure about 8" overall.  Next you will take a needle and thread and do a running 
 
stitch through all the layers just over where you have tucked the fabric in.
 
Put tight to gather the stitches and make 2 bow loops.  Do the same with the other piece.
 
Now you need to lay the two pieces crossing each other and tack together from the back side.
 
 
Now we are going to do a really fun covered button.  Use a button that you can cover that is about
 1 1/8" in diameter and cut a piece of fabric big enough to cover and wrap around the button.
 
Tuck the raw edges into  the prongs of the button to hold and then pop the back on it.
 
Next I took a piece of pretty bullion fringe and took it apart to use the cord it was made up of, but you can use any decorative cord you would like.
 
Now, cover the pretty side of the button completely with fabric tack glue.
 
Start with one end of the cord and place it in the center and start wrapping it around on the top of the button.  Be sure to press it down occasionally to make sure it st adhered to the button.
 
Keep going until the fabric is completely covered, then snip the end and glue it to the back side so that it doesn't fray.
 
Now you will stitch it to the front side of your rosette, right in the center where your 2 bows cross.
 
Next I add a drapery hook to the back with the point outside and the end that would normally hook onto a curtain rod just under the gathers of the back set of loops.
 
Turn your rosette over where you can see the pretty little thing and poof up the loops to make it pretty.
 
Now, hook  it onto your gorgeous window treatment!
 
Aren't you proud of yourself?!

Wednesday, September 4, 2013

Yipes! Stripes!

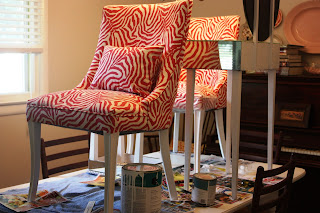
It is so much fun to see something transformed.  I went to my daughter's house recently and we worked in reviving a couple of second hand chairs into great accent pieces.  They were slightly worn and a drab sort of green.
 
As  you can see they didn't add a lot of interest, so to work we went.
 
Off came the old fabric. 
 
The old fabric became our new fabric pattern.
 
The new fabric starts going on in exactly the reverse order that it came off. Seat first.
 
Then the inside of the back.
 
A little sewing on of cord and then applying it and then the outside back
 
The legs got painted in the process also and a little leftover fabric became a amall lombar pillow.
 
Voila!  A POP of color!  Love those pink zebra stripes!


Tuesday, August 13, 2013

Prettypotholders

I have been so frustrated that my computer doesn't want to stay connected to the Internet. I can't figure it out and therefore can't blog.  So here we go,  giving it another try. 
    I find when I get frustrated I work on miniatures to relax.  I went to a show this weekend and was inspired to try to crochet in miniature.  I already tat tiny things, so how hard could it be?   Well, it can be hard!  Needed to dig out the extra magnifier glasses so I could see what I was doing, for one. 
     The first try the scale turned out to big. not because of the stitch size, but because I hadn't made adjustments  to how to do a certain look.  Fewer stitches! Anyway, I did manage to achieve two vintage style potholders like my Grandmother used to use, after about 4 1/2 hours!

 
Kind of cute, huh?

Monday, July 22, 2013

Nature' Art

I am back after a week of helping my mother move a condo.  Now I won't have to worry about her climbing up and cleaning out gutters, or falling while clearing snow, etc.  Whoopie! And she will have things easier by not having to worry about maintaining the house! 
    NOW back to THE project!  There was a large blank wall in the sunroom that we wanted to make a focal point for some kind of art, or something to bring nature to that side of the room, as all the other walls bring the outside in.  One idea was a waterfall fountain, but maintenance was more that they wanted to deal with.  Who can blame them for that!  The end decision was to place a beautiful piece of granite on the wall in a cutout as a feature.  Looks great in the room and so unusual!

Friday, July 12, 2013

Trunk for the junk

I thought I'd take a little side trip away from the work project today, and show you a recent hobby project in miniatures.  A dear friend of mine passed away and left behind a large collection of fine miniature's as well as lots of kits and materials to make more.  She was an acomplished miniatrist and had exquisite taste. She stipulated, before she passed, that she wanted to let the club have her trunk kits to put together.  Well, she really had the kits!  Kits, kits, and more kits!  So many that each member was able to choose 3 kits.  There were some left over that will be passed on to be sold for fund raising for one of our favorite miniature organizations.
  I volunteered to teach the rest of the club how to put these kits together, so I did one first to get the method down and have a finished one for everyone to see. I laid everything out before getting started.

 
The first step was wallpapering the inside of the trunk.
 
 
Then you start gluing the piece together, making sure that the pieces are all right side up!  We won't go into why I had to specify that part.
 
Next I sanded to get the curve and sides smooth and even with the fit being just right.
Next I painted my faux leather to be the color I wanted and applied it to all of the outside.
 
Next, shiny tape makes the metal around the trunk, wood slats which I prestained applied and finally the brass finding for the hardware.
 
Voila! After only A FULL DAY'S WORK, I had a finished ladies wedding trunk!


Wednesday, July 10, 2013

Fine Dining

The project continues and this idea really worked.  The living and dining rooms were two fairly small spaces, especially the living room. The living room was never used, and with the great family room and the new sun room, and downstairs recreation/family room.......well, how many sitting rooms do you need? So the idea was to turn those two rooms into one room for dining in style. 
    The table was already there, and barely navigatable in the smaller room.  There was no room for a buffet or any other piece of additional furniture, so the space just felt overwhelmed by the table.  I wish I still had the before pictures, but hard drive crashed and well...........
    We took out the arched and pillared opening between the two rooms, centered the table and new light fixture and added beautiful painted panels and texture on the walls.  While we were blowing out walls on the back of the house anyway, the center window was removed and windows moved to the side and an alcove with a built in buffet installed.  Now there is plenty of room for a large gathering and great conversation.  Love the peaceful color, too!

Monday, July 8, 2013

Sun room comfort

The  project I have been writing about had some major expansion work done, as you could probably tell by the photos of the kitchen.  Well, it went even further.  A sun room was added where a deck used to be and then some.  The kitchen actually took up at least half of the old deck.  That also entailed blowing out the basement and adding an additional play room.  I'll show that at a later date.

The sun room is now a place where sitting and reading is a joy and the breakfast area is now in there. 

 
Italian tiles were put on the floor.  So pretty.
The photos don't show the gorgeous cathederal ceiling.
 
The window shades are Hunter Douglas Pirouettes and are motorized.  There were so many that opening and closing them everyday can be quite a chore, so now, with just a touch of a button they can open all or just as many as they want at a time.  Where the sun falls during certain times of year, only a couple need to be closed, while the others are open, to control the light.  When all of them are opened, they are hidden in the upper woodwork and you wouldn't even know that the shades are there. Soooo coool!  They are so quiet when they operate, we must have played with them for a half hour, just watching them work! Awesome installation!

Saturday, July 6, 2013

Warm Family Space

This was a wonderful project, that went on and on in a good way.  We were able to take a more traditional room


 and turn it into the contemporary look and feel that the client is much more comfortable with. We also warmed it up and made it much more inviting.
 
As you can see, the beams were removed and the window framed out. Now contains a Hunter Douglas Pirouette for privacy and light control.  New Benjamin Moore paint sure made a difference!Love Ben's  colors as there must be 8000 of them.

Wednesday, July 3, 2013

Dream Kitchen

It is so much fun to work on a project that makes the client's dreams come true.  One such client had a kitchen that was not sufficient for her needs as a cook that loves to entertain people in her home.  The cabinets were too high up, as she is not very tall and not easy to navigate if more than one or two people were in the space.
                                               Before:
 
Moving around could be rather tight.  Well, to work we went, and with tearing down walls and expanding the space, a new and wonderful space came about.  Places for her to work in the kitchen without others having to get into her work space, but yet still visit. New cabinets she could reach, a new pantry, beverage center and sun room to for the crowd to flow into. Actually, much of the home was redone.


Large, open and inviting. What more can you ask for?   More on this incredible house later.

Saturday, June 22, 2013

Of all the places.........

Today my husband and I were taking one customary drives to pick up cars (we have a small used car dealership) that were purchased at auction and decided we were hungry. It was just a bit past 1 in the afternoon and we hadn't had lunch yet.  We decided to get a sandwich at one of our favorite places and as it turned out a bunch of motorcycle gang type guys were also eating there. 
   Now, I don't have anything against bikers, as I have been known to ride bikes myself and had a Harley for awhile.  We still have an Indian. But it was the general type of biker that we didn't feel like enjoying our lunch with. Anyway, we decided we wanted a nice peaceful lunch and a wonderful park was nearby, so we took our sandwiches to go style and headed to the park.
   This is a huge park, and I will admit that I haven't spent alot of time there, but we were having a terrible time trying to locate a picnic table, and I don't keep a blanket in the trunk to spread on the ground for a picnic.  It seems that this huge park, which has a number of shelters, only has picnic table in shelters. All we wanted was a single table or quiet bench in a shady spot some where.  All of the shelters were taken up by family reunions.

 
I guess there aren't any, so we pulled into a parking lot that absolutely no one was using, pulled under a nice tree, had the windows down and started to enjoy our great sandwiches, when all of a sudden this old beat up pick up truck pulls in right in front of us, nose to nose with us! I mean, not 3 feet away! Out jumps this woman who is screaming and cussing into her cell phone at some guy ( you could tell by the conversation)  and carrying  on like there's nobody else around.  A teenage girl is in the car, with a total look of boredom, as I am sure she has been through this drama before, just biding her time, while Momma makes a complete horses behind ( I've never been one to use the usual term) of herself.  My husband says "I don't think she needs the phone. He could hear her without it".  She hangs up, picks up, and is at it again, hangs up, picks up.......Well you get the picture.  We actually found it to be quite an entertaining show. We finished our sandwiches and headed out  to finish our errand. As we were leaving I thanked my husband for the nice peaceful lunch, giggle.  His reply: a  screaming " You're #!*#ing  welcome!" LOL    
"Of all the places in all the world" come to mind, doesn't it?

Thursday, June 20, 2013

Sneeky little creatures

When I went outside the other morning to water the plants, I found that some little critter had gotten to the rocker in the gazebo.

 
The critter sure did a number on the cushion.  Now, I am not really all that upset about it.  The fabric is really faded from what used to be a bright, cheery pink and green floral print.  It is very tired and I had planned on starting to look for something new to put on it.  It looked so bad that I couldn't stand it and I didn't want to take the time to go on the "great search", so I hit the scrap boxes and found something I felt would pass for the summer. Less than an hour later and voila!  New cushion!  Thank goodness I had extra foam on hand! 
 
 
 I am sure it, too, will fade by the end of the year, but then I can flip it over and get next summer out of it, assuming Critter doesn't take another go at it.